
The challenge is always on to create beautifully decorated abode. These days, more than ever, budget is also a factor when choosing furnishings to adorn the home. This is a wonderful opportunity to be creative and have fun becoming one with the task of decorating.
Decoupage is more than just for Kindergarteners.
The technique of decoupage brings back memories of having fun in the early school days covering balloons in art class and getting covered with glue. Decoupage has grown up and has become a wonderful application for decorating.
Resurrect an old piece of wood furniture, a floor, or even a dress a wall using the old fashioned fun of decoupage.
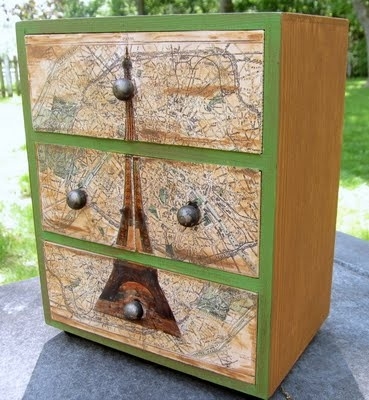
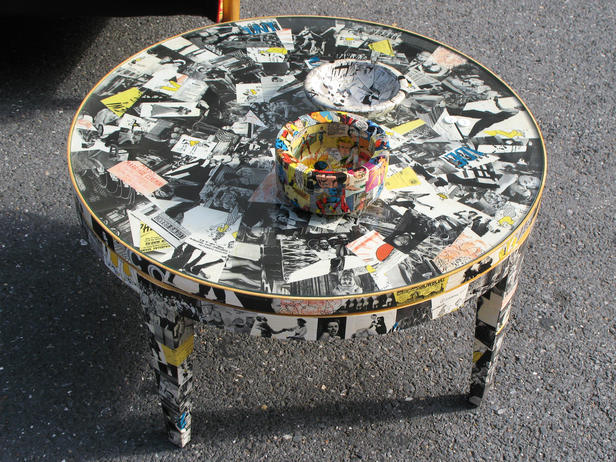
- An old table or dresser can be transformed into a brand new piece of furniture.

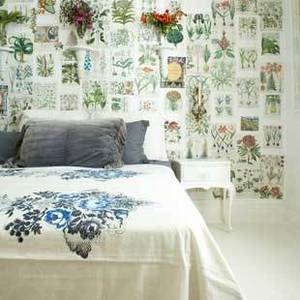
indulgy - Revive an old wood floor or dress a cement floor in decoupage.
- Adorn an accent wall using the technique of decoupage.

casasugar
Decoupage is a wonderful eco-friendly and fun green activity that the entire family can enjoy helping out with.
Save the old table from the dump along with books and other materials that can be repurposed for a new piece of furnishing simply with a bit of glue and varnish.
Decide on what your project will be; are you covering a piece of furniture or an entire floor in the room.
Gather up the simple supplies that will be needed for the project.
- Have fun gathering paper to use for the project such as old book pages, newspapers, phonebooks, maps, music pages, paper bags, or any other paper that can be cut up and glued.
- PVA glue, which stands for Polyvinyl acetates, is simply the old-fashioned white glue used in your early school days.
- Scissors.
- Paintbrush and/ or roller.
- Rubber roller.
- Enough varnish to cover the project, for a floor you will want to use a few of coats of polyurethane.
- Sandpaper or electric sander will be needed if covering a shiny surface.
Time to have fun and create your new custom designer furnishing.
1. If covering a gloss painted surface than use some sandpaper to sand the gloss off. For a floor you can use an electric sander.
2. Make sure your surfaces are clean of any dust and dirt.
3. Time to have fun and cut up your paper. Cut the pages into even squares or be free and just cut into uneven shapes. The pieces should not be too big or small; keep them around three inches square. Paper bags or brown paper can be torn instead of cut for added interest.
4. Start with one corner and paint the glue onto a small section at a time and place your cut out paper pieces smoothed out on top of glue. When overlapping add some extra glue to paper to ensure that all of the paper and its edges will be glued down to the surface. Work your way out with the glue and paper until the surfaces are completely covered. Make sure that surfaces are completely smooth and free of bubbles. A rubber roller will help smooth out any bubbles.
Be creative and add a surprise shape or silhouette to stand out as a design statement in the center or corner of your project.
5. Edges need loving care on furniture; in order to finish the edges of furniture be careful not to bunch up the paper when wrapping a corner or edge. For rounded pieces let your paper extend past the edge then grab the scissors and splice the paper with parallel cuts towards the edge of the furniture piece. This will allow you to wrap the edges smoothly to the underside (make sure the paper is glued to stick to surfaces). If the edge has a detail then use a finger to smooth the paper into the detail. Cover the bottom side of the piece of furniture and finish by covering the edges from the top that have been wrapped.
6. Time to finish the project. Simply brush on the varnish over the complete surfaces that have been decoupaged. You can use a roller to cover a large surface like the floor or wall. For several coats make sure that the appropriate time is given for drying between coats.
Enjoy your new furnishings. Your abode is your own private art gallery. Display your decor as proudly as an artist would show off his or her creations. The abode is your own private oasis to showcase your personality so let the inner you shine through the decor and never be afraid to dance!
Show me your support and subscribe to this blog! Sign in under email subscription at the top of the column on the blog’s right side.
Subscribe and enjoy reading all of my articles under the titles of Interior Decorating, Long Island Interior Design,Decorating, Arts & Exhibits, Lifestyle, as well as General Pets, Fashion Trends, and Long Island Prepper written for Examiner.com.
Be sure to follow me on my twitter page!
Like my Facebook page!
Visit weberlifedesign.com for further inspired professional design and lifestyle advice!
